Do you want to build performant and progressive applications with a framework that offers cross-platform compatibility and intuitive UI? React Native framework is what you need! We have compiled a guide, which will help you discover everything that you need to know about React Native Development from a business perspective.
Mobile usage has seen spectacular growth in the past few years. Across the globe, web-enabled devices like tablets and smartphones have evolved into essential tools for entertainment, information, and communication.
This upward trend is specifically visible in the developing digital markets, with handhelds being the prime location of various applications.
As a result, tech companies wish to build user apps that offer cross-platform compatibility, smooth User Experience (UX), and a responsive User Interface. And that gives rise to the REACT Native Development.
This guide will cover everything about REACT Native Development, compare the ideas with React and see how it works with app development.
What is React Native?
React Native is an open-source UI software created by Meta Platforms, inc. It is used to develop applications for Android, Android TV, iOS and macOS, tvOS, Web Window, and more by allowing developers to use React framework with native capabilities.
How is React Developed?
ReactJs was announced by Facebook in 2015. Before developing React, Facebook was confronted with a major user experience task of building dynamic UI with high performance. The engineers want to integrate a feature in the app that allows users to open both news feed and chatbox simultaneously. To achieve this, Facebook had to optimize the development process; thus to do this, the team releases the ReactJs library on the basis of XHP and JavaScript symbiosis.
Later, Facebook realized that ReactJs works faster and thus released it as an open-source JavaScript tool. Thereafter, it released React Native, a hybrid mobile app development framework for Android and iOS.
Which Language Is Used In React Native?
React Native uses JavaScript, a programming language that helps mobile application developers develop apps that are compatible with both Android and iOS.
What is Reactjs?
Reactjs is a JavaScript library that supports both the server and front-end. It can be used to create a user interface for both websites as well as mobile apps.
Also Read - What are things I need to know to start learning ReactJS?
 React Native Vs. ReactJs: What Is The Difference?
React Native Vs. ReactJs: What Is The Difference?
React Native uses the same native building blocks as you use when developing native apps with Java, Swift, or Kotlin. However, the only difference is that you use these building blogs together with JavaScript.
So, if this is just an API wrapper, why do developers like them? React Native is the better than other platforms because it gives developers a lot of impressive features that improve developers’ experience, like Live Reloading, which refreshes the app in a few seconds, and Hot Reloading, which makes changes in code without reloading the app.
What is Expo in React JS?
Expo is an SDK that offers features like OTA app updates, camera access, push notifications, social authentications, and more for free. Expo also has an online ground, Snacks, through which you can try other people’s code online or can work on bite-sized projects without creating new projects in CLI.
The prime concept behind Expo is to extend React-Native through pre-written features. Expo comes with impressive documentation with a long list of APIs in the sidebar.
Does react-native follow a different approach for the same concepts that are used for React?
No! For instance, props (used to pass data from one component to another) and states (a local data storage that is local for the components and is not passed to other components) work the same way, and components have the same idea of how to work in React.
React Native also allows you to access React APIs; however, you cannot implement some features the same way you use in React because of different logic implemented on the web as compared to the mobile.
Keep in mind that default components may behave and look differently on different platforms. So, you must test on all platforms before making the app.
What Are The Building Blocks Of UI If You Are Not Using HTML Elements?
There are some pre-written components that you can use with react-native. For instance, instead of <div>s, you can use <View>s, and for displaying texts, you use <Text>; for buttons, you use <Button> and more.
Creating Your React Native App:
This section will explain how you can create your first React Native app with the help of Android development to develop it, you need to set an environment using OSX as a building platform. Let's understand this step-by-step:
Step 1: Prerequisites and Dependencies Installation
This step is about installing the Watchman, React Native Command-line interface, Xcode & cocoa pods, and Node. And, if you already have a Node installed on your system, make sure it is Node 8.3 or the latest version. Also, install Xcode and other necessary tools that are required to build your iOS app.
Step2: Install NodeJs Python Jdk8
Step3: Install React Native CLI ( this step is optional)
Step4: Create your react native project by using the following command:
Cd ~/Desktop react-native init Awesome Project
Step5: Run react native project on iOS with the following command Desktop $ cd AwesomeProject
SwesomeProject $ react-native run-iOS
Step6: Install Android Studio
Step7: Configure the AVD Manager to start the configuration
Step8: Select the device option and start the Android enumerator
Step9: Start Android
Using Expo CLI To Develop The App:
Expo CLI is the first choice of developers because of its simplicity. Apps developed using this is cross-platform and can easily run on most of the OS like iOS, Android, and Windows.
For this, create a new app by opening a terminal and following the below command:
Expo init expoDemoApp

How To Run React Native App:
Once your setup is complete, you will get a success message and details on how you can run your first React Native app. To start, type:
cd expoDemoApp
yarn start
Once entering the command, you will notice that the Expo Developer tool will load and start the default browser. You will also see a QR code on the terminal.
Scan the QR code from your phone camera and download the app in the App Store. From there, open the app and scan the QR code in the Expo developer tools and open the project in the Expo.
Here you will see your app:
Using React Native CLI (for Pros): To create a React Native mobile app using CLI, follow the below steps:
- Install the react-native-client by using the command- nm install- g react-native-CLI
- Start the project by creating the project structure with the Android and iOS folder.
- Use Simulator to run the project; in Android, use the following command:
Window+R->appdata->local->Android->sdk->emulator. Open this path and execute the below command:
Emulator –avd
To view the available emulator: emulator –list avds-react-native run-android
For iOS; follow the below command:
React-native run-iOS- simulator =”iPhone x”
Building the React app for Android
When building the React Native android app, follow the above steps:
Install Node, Watchman, and JDK (dependencies)
Set up the Android dev environment
To install the Android development environment, you need to start by installing Java:
Step1: Install Android Studio; make sure to download the latest version
Step2: Setting the Android Studio by following the above steps:
Use the Setup wizard to configure and then select the preferred settings and download the SDK components.
How You can Construct an app using React Js.
Let's construct a fun minigame 'Coloridentify. The main game screen is very simple; it is built from a few tiles that have different colors, except one. The player simply needs to tap on different tiles as fast as possible.
How to set up a React-Native development environment?
The first step in setting the React-native Development is having Node.Js, and Expo CLI installed. For this, follow this query:
npm I –g expo-cli
Now, let's initiate the game "Coloridentify" as said above, the idea is to identify the different colors.
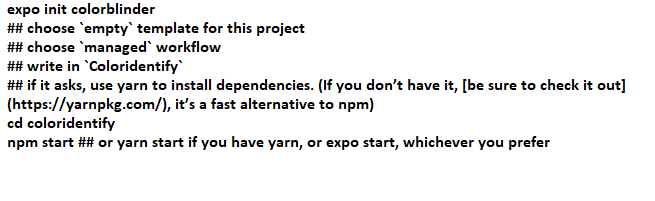
This command will develop the project and open a new window with the Expo Devtools.
Structuring the game:
To structure the React-Native Game, let's explore the directory structure:
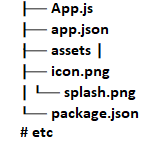
App.json: It’s a configuration file that contains the SDK version, logo/splash screen directions, name, platforms, GitHub URL, and many other things.
You can develop the game on your own by downloading the assets and copy-pasting them directly into the asset directory. Just make sure to overwrite the icon.png and splash.png. Once pasting, open the app, and you will notice that the size of the splash screen is not appropriate.
This means, before initializing the home screen, you must fix this; in the app.jason, under the splash property, change the background color to #0a0a0a.

Getting started with React Native:
The first step is to add react-navigation as a dependency to the project.
yarn add react-navigation
## if you don’t have yarn: npn install react-navigation
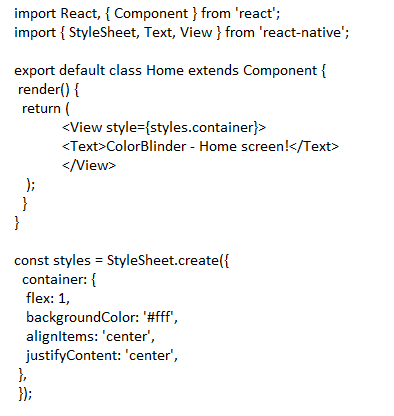
Create a components directory for the components and a screen directory for the screen you want to compose. Keep in mind that both the directories are at the root of the project, and create Home.js. in the screen directory. Copy-paste this code into the following code:
Initializing the Routing:
Now that Home.js is executing something, let’s initialize the routing in App.js:
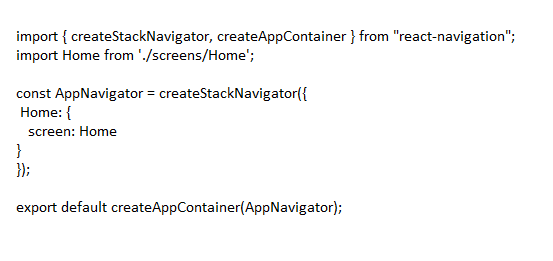
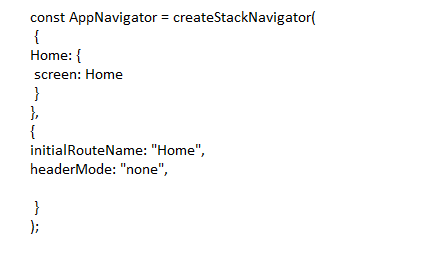
Here, we are using react-navigation’s createStackNavigator; it initializes a new stack navigator that returns the React component; you can export it from App.js.
After running the code, you will see an empty navigation bar; an empty navigation bar will doesn’t make the game look good or impressive. So, to add more properties, follow the below code:
Adding custom fonts:
To add custom fonts, you first need to rewrite the App.js as followings:
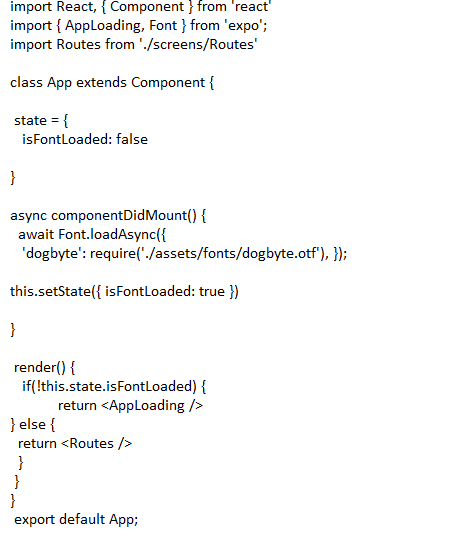
In the above code, we are importing the font dogbyte. The state has isFontLoaded property, which is true when the font is loaded. While the font is not loaded, it will render the <AppLoading /> component, which comes from Expo SDK.
When the this.state.isFrontLoaded is true, it will render the Routs component, which is undefined. So, create a file under screen named Routes.js and copy-paste the navigator code.
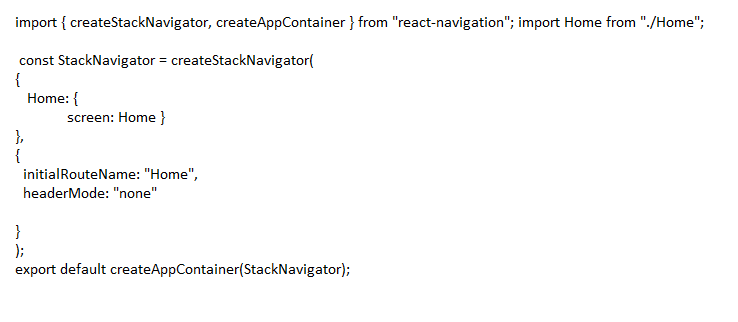
At this point, you have basic navigation initialized and can custom font the design.
 12 Tips And Tricks Developers Should Know About React
12 Tips And Tricks Developers Should Know About React
When it comes to React Native development and React, there are various cool tricks and techniques that can make a developer’s life easy. While some of them you might use while working on your projects, some of them are a good deal that you have never tried. So let's get into knowing what they are:
1. Using Smart Components Against Dumb Components:
Also known as container components, smart components relate to the efficient operation of the user interface. It is responsible for API calls, status management, data recovery, and more. These smart components help in data recovery, status management, and more.
2. Using State Management Library (Mobx, Apollom Redux):
Most of the time, developers use local variables, arrays, and object declarations that are specific to the components. But what happens when the same components are used in other components? Then, use the States State Management Library so that you can access your array, variables, and objects through the app.
Also, you can update and listen for any change in the Component. Some popular state management libraries that allow developers to access these variables through the app are Redux, Redux-Saga, Redux Rematch, Apollo, and MobX State Tree.
3. Optimize React-Native Images:
Images are an indispensable part of modern apps. They are static resources that are accessible from any local directory or can be extracted from the backend easily. So, instead of processing them from the client-side and crashing your performance, optimize them from the server-side. With various CDN options like video hosting, IBM cloud, and more, you can easily place the API calls to upload images to the server.
4. Instead Of The Static Method, Use Event Listener:
Let's say you are using one Component and want to call one from the previous Component or any other component; at this time, you are using the static method from the class component. However, instead of using the Static method, you can use React Native Listeners. You can also add a listener component where you want to listen and emit the event where you want to call a function.
5. Remove The Listeners In Unmount:
If you are adding listeners to the events like EventListeners, navigationEventListeners, TabEventListeners, etc., it will create listeners for you. But, if you forget to remove it on ComponentWillUnmount then next time, if you want it back, it will create another listener object, which creates a conflict between the memory leak.
So, the best thing is to remove the listeners in the ComponentWillUnmount to it will free out the memory and give you uninterrupted behaviors.
6. Use Context For Themes Management Dark:
Developing applications that support both Light and Dark themes are common these days. So, it is recommended to manage themes by using React Context API to set up a context in App.js and to add Themes Listener in App.js. This means that when a user changes the theme, App.js gets notified, and themes will get changed.
7. Don't Optimize If You Don't Have Any Real Performance Issues:
React comes with many smart techniques that help reduce the DOM updates, which are done by the virtual DOM technology. This is the only optimization that you need mostly; therefore, you should start optimizing the React Native application when you notice a decline in performance.
8. Use Storybook- Isolated
Every application has various components like Button, Textlnput, etc. that are used at various components. So instead of identifying separate code for every Component, create a common component and use it in the Component. This will help in managing the application from one place, and the changes you will make will reflect in the complete application.
Let's consider this with an example- if I say, show the components that you have developed and change its 'font.' Ideally, you will import the code into one Component and then run the application.
But, the storybook will give an interface where you can see all your developed ReUsable components in one place. To use this, you simply need to create a Story and improve your Component in the Story. This way, it is easy to render the stories and easy to integrate.
9. Minimize Use Of The Third-Party Library; Instead, Use Your Own Code Logic:
If you are using any third-party library or NPMs in our application, start using your own code logic. The issue is when the iOS, Android, and React Native versions upgrade, you forget to upgrade the library and NPMs, which breaks the application.
Also, the creators of Library and NPMs are updated with the latest security standard, which creates hurdles in the application. So, instead of using the Third-party Library and NPMs, you must create your own code solution so that you can update it easily.
10. Firebase Performance Monitoring:
Firebase performance monitoring helps developers identify when and where the performances are improved so that they can fix those issues to provide a better experience. The FPM allows you to track HTTP request performance traces and let you do custom tracing as per your business needs.
11. Configure The Environment Setup:
Use React Native configuration to set up your app configuration for Test, Stage, and Live environments. There are various different API, URLs, and constant variables that can hinder app development. So, follow the react-native-config steps and manage the environment.
12. Cache Images:
Image optimization is very important for identifying the React Native App Performance. This means that if you have an application where you need to do maximum image rendering and images are not optimized properly, it will eat more memory, which can crash the application. So, to avoid this, try:
- Using PNG images instead of JPG
- Use small resolution images
- Use the latest version of WEBP format for images; this will help in reducing the binary size of the Android and IOS.
Common React Native Developer Tools:
React Native plays a vital role in accelerating app development. Some of them are:
Nuclide:
A nuclide is a free and open-source react-native tool that is developed as a single package.
A nuclide is a package developed by Facebook that is integrated with the Atom editor. It is used to build mobile apps and comes with impressive features like element inspection. Also, it allows you to live edit the React Native elements.
Bit:
Bit helps in building the team's next-gen React Native components library. It helps in sharing and collaborating on the UI components. The Bit is also a powerful way to provide UIs with independently developed, shared components, versioned, and updated.
With the Bit. dev platform, you can host and organize your components. Bit.dev uses Bit's CLI tool that lets you push the independent components from any local project. With the Bit.dev, developers can search, render, install and update the components of a new project.
Bit can do its magic by tracking the dependencies of every Component and considering it as a stand-alone unit of code.
Atom:
Atom is a free and open-source text editor that is popular for its straightforward approach and hacking. Atom was launched in February 2015 by Github and supported Mac, Windows, and Linux.
Its services include a dedicated package manager, multi-file navigating, and cross-platform editing through a single window, themes, and custom design.
Visual Studio Code:
Visual Studio Code is created by Microsoft; it's a free and open-source native React source editor. For JavaScript developers, it supports TypeScript, JavaScript, Node.js. It provides a network of extensions that support other languages like c#, C++, PHP, Python, and Java.
Xcode:
Xcode is Apple's development environment tool for MAcOs, iOS, etc. Xcode helps in securing your React Native apps for iOS. Also, Xcode is not only for building apps but also for debugging and installing iOS packages.
React devtools:
React Devtools is used for debugging the ReactJs components as well as React native code. While it has some limitations, the latest version supports live editing and inspecting the style for React native.
Expo:
Expo is an open-source toolkit used by React Native Developers. It offers various resources like slack community, documentation, community forums, and more.
Reactotron:
Reactotron is a desktop application made by InfiniteRed for debugging and inspecting React Native. This provides you with everything you need to debug a React Native app.
React-Native CLI:
The React-native CLI supports a custom configuration. For instance, you can use the CLI to install the React Native project pre-configured with a special package like TypeScript.
What Are The Features Of React Native?
High speed with Document Object Model:
As a business, one of the best things about Reactjs is the ability to bring speed to the websites and applications developed through DOM (document object model).
In this, React creates an in-memory data structure cache that helps compute the resulting differences and then updates the browser's document object model. The programmer writes the code as the complete page is rendered on every change. However, in reality, the sub-components that are changed are only rendered.
This gives an edge to Reachjs as compared to other platforms for developing a successful mobile app.
Easy to Learn:
React, as compared to the other front-end frameworks like Vue and Angular, is easy to learn. Also, it helps businesses easily build their projects. The harder it is to learn the technology or framework, the more time it will take to start the development process. But, the React framework is easy to learn and get started; businesses are inclined toward using them.
It's Very Popular:
In terms of popularity, React Native is one of the most popular cross-platform mobile development frameworks compared to Native Script. Its popularity is backed by the fact that it was launched by Facebook. According to a recent report, 16% of respondents indicated that they had used Native Script for developing the apps.
One-Way Data-Binding:
One-way data-binding means one-directional flow; this means that the data in the react flows only in one direction. This also means that the data is transferred from top to bottom (from parent to child components).
The properties in the child component cannot return the data to its parent component but can communicate with the parent component to modify the states according to the inputs.
Extension:
Node React JS has many extensions that you can create to create full-fledged UI applications. It supports mobile app development and provides server-side rendering. React is extended with Redux, Flux, React Native, etc., which helps in creating a good-looking User interface.
Javascript Syntax Extension:
JSX is the combination of HTML and JavaScript; you can embed JavaScript objects inside the HTML elements. JSX is not supported by the browser
Component:
React.Js divides the web page into various components as it's Component-based. Each Component in the React/js is a part of UI design, which has its own design and logic.
Frequently Asked Questions - FAQ
Which Factors To Consider While Deciding On The React Native Development Service Company?
You must consider a trusted React Js company that adheres to international standards and follows the agile development process. Also, the company should be able to deliver the project on time and has an expert react-native developer team outstanding post and pre-delivery support system.
How Much Time Does It Take To Build A React Native App For Ios And Android?
Duration for React native project is determined after analyzing various factors like size of the project, platform to develop, complexity and amount of design, functionality, and features.
When To Avoid React Native Mobile App Development?
React Native is used for various things unless you have any platform-specific requirements and want to make customization. Therefore, when security requirements are high, you have enough resources, like money, to spend on building a strong platform.
What Is The Cost Of Creating A React Native App?
The cost of the project varies from project to project according to the project requirements. It can vary according to the project requirements and the project managers.
Is there any difference between React Native and React Js?
React Native is the complete framework, whereas React Js is the javaScript library.
Can we use React Js code in React Native?
React Native for the web is an open-source project that lets you use React Native core components in the React web application. React Native for Web uses the React DOM to render the JavaScript code, which is compatible with React Native.
Conclusion:
Now that you know everything about React JS, getJS get into the app designing and start creating! Your team in India can assist you. Our developers not only have significant expertise in creating online apps for a wide range of organizations, but we’ll also work with you to understand the difficulties you need to tackle with React JS.


