Redux is a powerful and popular state management mechanism.
You will be able to apply the dark mode theme configurations to each page and UI elements in your app by accessing the central Redux store. The process will conveniently and efficiently implement dark mode in any React Native application.
Setting up a React Native App using Expo
There are two approaches to getting started with the React Native project: the React Native CLI and Expo CLI. First, you need to install Expo CLI on your computer. Install it by using the following command:
npm install –global expo-cli
Create a folder where you want the project to go live, and initialize your React Native app using the following Expo command:
Expo init dark_mode_switcher
Select blank : a minimal app as clean as empty canvas > dark_mode_switcher directory once the application has been created:
cd dark_mode_switcher
To start the development server on iPhone, run: npn run ios
Now, open the camera app and scan the OR code shown on the terminal or use the Expo dev tools web to automatically launched.
If you are using Android device, run: npn run android
Install the Expo Go and then in Projects, scan the QR code. You will see the below-mentioned code for launching app on iPhone or Android:
Open up App.js to start working on your app!
On your App.js file, change the rendered text to ‘we are on light mode’. After this, you will create a button that allow us to toggle between different modes. First import the button from the react-native through the command:
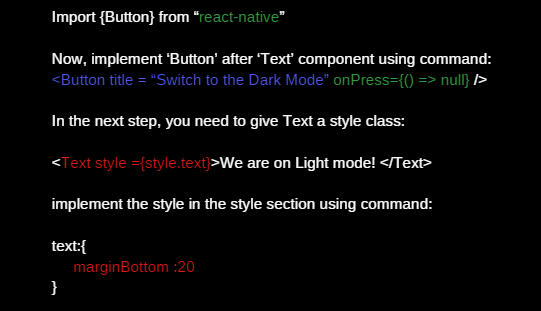
The output will be like
We are on the Light mode!
Button Switch to Dark Mode
Implementing Dark mode using Redux:
Redux is a powerful and popular state management tools that can be used in different JavaScript frameworks like React and React native. Redux stores the state configuration of the UI elements and let you predict the state containers.
You can use Redux to store predictable state containers. Here we’ll use Redux to know whether you are on dark or light mode screen.
For this, first, you need to have rect-redux and redux libraries installed. Now, run the npm command to install the necessary dependencies:
npm i react-redux redux
Next, create the redux-store directory at the root directory of project and see the actions, constants, reducers and Redux store.
Constants are the name of states that let you find the specific functionality that you want to implement in the application. To create the ‘theme’ constant, create ‘constant.js’ file in the redux-store directory. You will see the following constant:
Export const THEME_CHANGE = ‘THEME_CHANGE’;
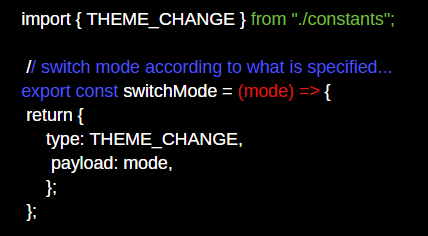
If you want to switch between light and dark modes, you need to create a SwitchMode command. For this, first create an ‘action.js’ file along the ‘redux-store, then add ‘switchMode’ action code block:
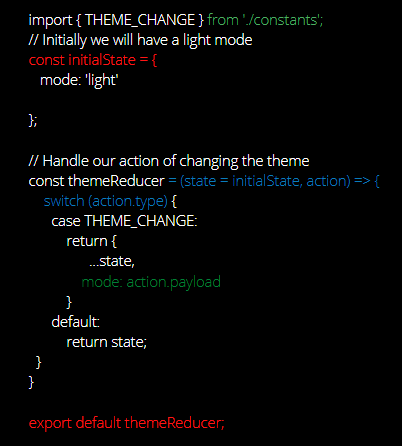
The reducer shows how the actions transform the current state in the next state and check which actions are executed when the above command is called. Depending upon this, the action reducer will update the state values and change the mode according to the action type.
To setup the reducer command, create a reducer.js file in the redux-store directory and add the following command:
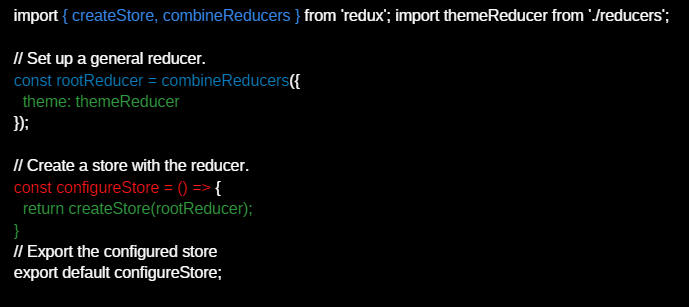
Redux holds all data that you can easily access from anywhere in your application’s components. Now to configure the Redux, create the store.js file in the folder redux-store and follow the below-mentioned code:
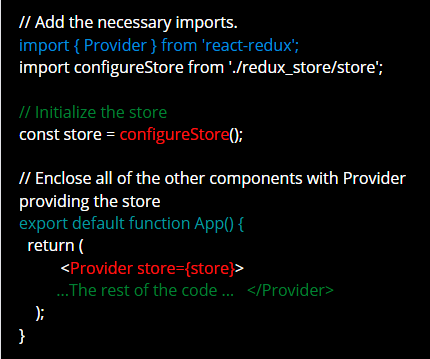
You can now access the store in the application and to do that go to the ‘App.js’ file and choose components with a ‘Provider’ that access the following command:
Recommended Read: 15 Advantages of ReactJS for Application Development
We are done configuring the Redux and setting it on the application. Let’s look at some other approaches to implementing and supporting dark mode in React Native applications.
1. Implementing the Dark Mode Using React Native Appearance
React Native has an in-built module appearance that gives users’ theme preferences. Following is the small implementation of the module to help you know how it works:
The color scheme of the above code can be changed by simply using a hook give by the Appearance modules :useColorScheme() : ‘Light’ | ‘dark’. This hook include the event listener and do re-renders when the user make switch from the OS’s UI mode. Here’s how the code will like when implementing usecolorscheme:
2. Implement Dark Mode by Using styled-Components:
Styled components are the most widely used and trusted libraries to style React applications. These libraries also support React Native and has very impressive features.
Styled-components have theming support by exporting the <ThemeProvider> wrapper component. Like other react context providers, the theme provider provide theme to React components. In the render tree, the styled-components has the access to given theme. You can use it with the React Native Appearance’s hook from the component tree. Follow the code below to provide theme to the child components:
Any component using the styled-component will have access to the theme as follows:
This method don’t use the inline styling approach, which was used in previous methods. This make the JSX look cleaner and maintainable as style-related items go in the style declaration.
3. Implement Dark Mode Using React Navigation:
Thinking about the navigation library is one of the most discussed things in React Native community. This offloads the implementation of making themes from developers.
You can pass the theme prop from the ‘NavigationContainer’; you can change the theme prop dynamically with the components updating automatically to reflect the new theme.
This is what the React Navigation’s theme looks like:
Once given to the ‘NavigationContainer’ any component can use theme from the useTheme () hook. Lets see this with an example:
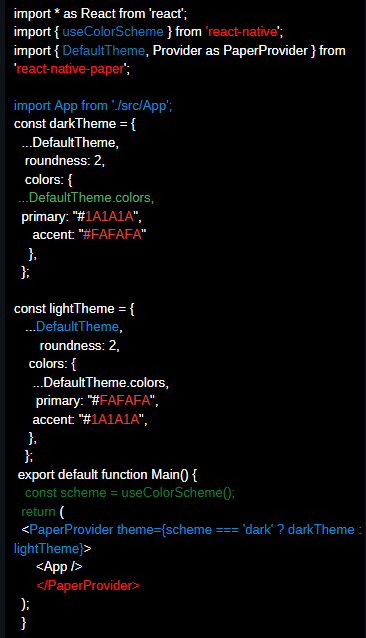
4. Implementing Dark Mode using React Native Paper:
Various UI libraries are available for React Native developers, but React Native Paper (a cross-platform material design for React Native) has become the most important one. React Native paper is a collection of production-ready and customizable components that follow Google’s Material Design guidelines. Having 30+ customizable components, it is one of the best choices to go with the Material UI.
React Native Paper has theming support. Themes provided at the top of component tree are used for all components.
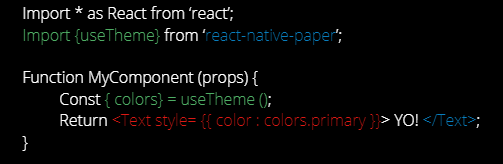
The theme is used via useTheme hook:
Controlling Dark mode with the Switch toggle:
Our Redux store with reducers and actions is already set up. Now, we can move on to configuring the dark mode switch in the Setting.js file. That’ll help us change the theme modes in the app.
The idea is to add the reducer state and action to the Switch component configuration. For that, we need to import the action and reducer into the Setting.js file. We also need to import the hook methods from the react-redux package in order to control the redux activities.
The Imports are shown in the code snippet below:
import * as themeActions from "../redux/actions/theme.action";
import { useDispatch,useSelector } from "react-redux";
Next, we need to initialize the reducer as an instance using the useSelector hook. Then, we also need to add it to the Switch component prop as directed in the code snippet below:
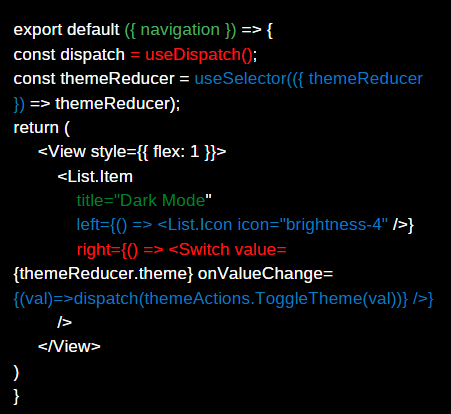
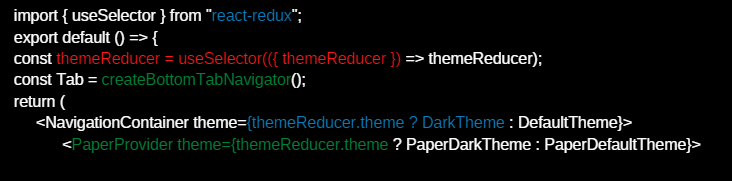
Now, the last step is to add the reducer state to the main navigation. For that, we need to import the reducer in the Navigation.js and use it as the conditional rendering of the themes.
We can do this by following the snippet below:
We should see the results shown in the emulator demo below:
When we toggle the switch we change the theme of the entire app to dark mode and vice-versa.
We have successfully implemented the dark mode toggle in the React Native app. It was totally based on the Expo ecosystem using the Redux mechanism to handle the state of the theme.
Enter react-redux
To implement the toggle-functionality, we need a place to store the currently selected theme and a means to toggle it. Ideally, this should be available throughout our application. This is where react-redux comes into play.
Admittedly, for our simple app, redux is very much overkill. However, I plan to use redux for my state-management later on in this app, so let’s roll with it now.
There are three things we need:
1. an actual store to hold the state
2. an action to dispatch intent
3. a reducer to handle that intent
Let’s take a Closer Look:
1. we use the useSelector hook to get state from our store using a selector function
2. we return our ThemeProvider and provide it with a theme based on the state in our redux store
Let’s update App.js so that it uses our newly Implemented DarkThemeProvider:
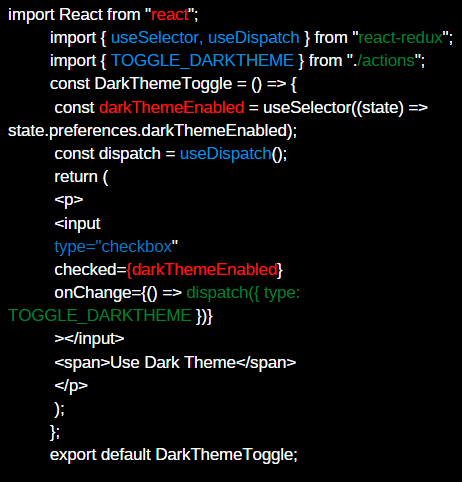
The DarkThemeToggle component pulls the required state from our store, again using the useSelector hook. We also use another hook from react-redux called useDispatch. Whenever our checkbox
changes, we use this to dispatch the TOGGLE_DARKTHEME action.
Finally, this is what the application looks like:
One more thing
There’s one last problem here though, and it’s a UX problem. Whenever I leave the page, it ‘forgets’ my preferred theme.
There are many ways to work around this, but I decided to store the selected theme in localStorage and rehydrate the redux store with it when the app launches.
The Magic Happens in the store.js file:
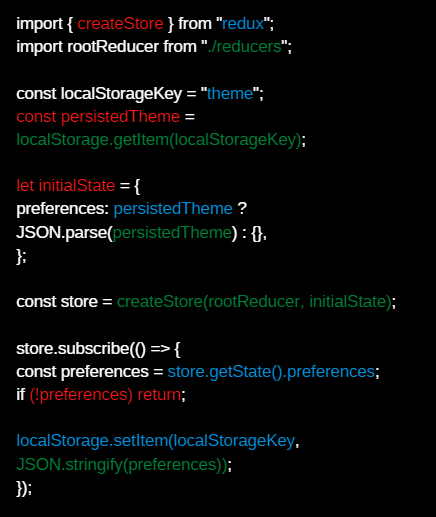
Export default store:
1. when building the initial state for our store, we check localStorage for any stored themes
2. we use a redux subscriber to update the localStorage whenever something changes to the preferences.
An essential part was setting up dark mode theme switching. The switch was handled between the react-navigation components and react-native-paper packages.
However, the highlight of the entire tutorial was teaching readers how to use redux mechanisms to manage the theme state. Also using the reducers and actions to control the state, and change the overall theme of the app.
Now, a challenge for you could be to use the same redux mechanisms to control other features in the application. Especially those features that are required to be handled globally. Some examples might be AdMob and offline connectivity features.