In modern web applications, ensuring that users have appropriate access to different parts of your app is crucial. Angular provides a robust mechanism for handling authentication and authorization through Route Guards, specifically the Auth Guard.
Auth Guard allows developers to protect routes by checking whether a user is authenticated before granting access. This not only secures sensitive data but also improves user experience by redirecting unauthorized users to appropriate pages. In this guide, we'll dive deep into how to set up and implement Auth Guard in Angular, making your applications more secure and efficient.
Let’s start!
What are Route Guards in Angular?
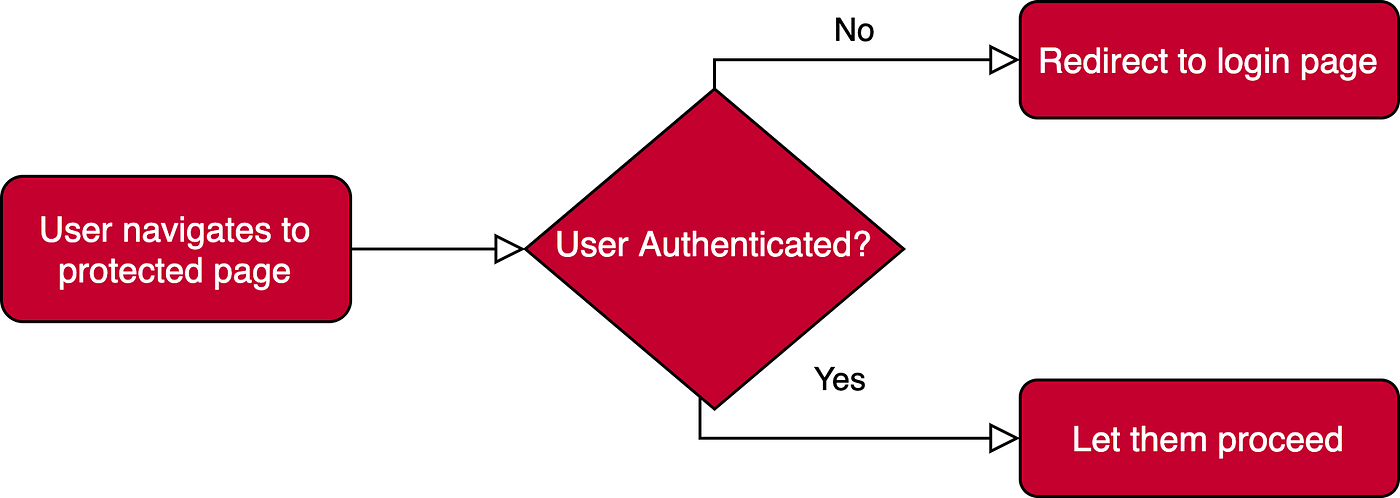
An angular route guard called Auth Guard is used to shield routes from unauthorised or unauthenticated users. The canActivate interface, which implements a canActivate function that determines whether the current user has authorization to activate the given route, is used to implement it.

Angular’s Route Guards are interfaces that allow angular developers to grant or remove access from specific parts of the navigation. The decision is made based on the ‘true’ or ‘false’ return value from a class that implements the given guard interface. There are different types of Route Guards in angular, and each one is known as ‘particular sequence.’
5 Different types of Route Guards are as follows:
- CanActivate - Controls if a route can be activated
- CanActivateChild - Controls if children of the route can be activated
- CanDeactivate - Controls if the user can leave the route
- CanLoad - Controls if the route be loaded
- Resolve - Controls data resolution before the route is activated
Steps to Create Auth Guard in Angular

Creating a route guard is pretty simple, and all it takes is three steps to make it happen. Here’s how you can create it.

Step 1 - Create an Authentication Service
We will be using one of the most popular authentication methods here: JSON Web Tokens (JWT), to authenticate users. So the first step is to create the auth.service.ts, which will be responsible for handling the authentication.
ng g service auth
This will help you create the authentication service.
import { Injectable } from '@angular/core';
@Injectable({
providedIn: 'root'
})
export class AuthService {
constructor() { }
isLoggedIn() {
const token = localStorage.getItem('token'); // get token from local storage
const payload = atob(token.split('.')[1]); // decode payload of token
const parsedPayload = JSON.parse(payload); // convert payload into an Object
return parsedPayload.exp > Date.now() / 1000; // check if token is expired
}
}
isLoggedIn() function will attain the token from local storage. Then, the validity of the token’s payload will be checked concerning its expiration time.
Read our other blog to know the features of AngularJS in detail.
Step 2 - Create an Authentication Service
Now you can use the command given below to generate the guard.
ng g guard auth
Once that’s done, you will see auth.guard.ts that will implement the CanActivate interface.
import { Injectable } from '@angular/core';
import { CanActivate, ActivatedRouteSnapshot, RouterStateSnapshot, Router } from '@angular/router';
import { Observable } from 'rxjs';
import { AuthService } from './auth.service';
@Injectable({
providedIn: 'root'
})
export class AuthGuard implements CanActivate {
constructor(private authService: AuthService, private router: Router) {}
canActivate(
next: ActivatedRouteSnapshot,
state: RouterStateSnapshot): Observable | Promise | boolean {
if (!this.authService.isLoggedIn()) {
this.router.navigate(['/login']); // go to login if not authenticated
return false;
}
return true;
}
}
Using canActivate() method, an instance of Authentication service and return will be used to check whether the user is logged in or not. Thus, the user will easily be redirected to /login route if they are not logged in.
Step 3 - Use the Guard Inside Routes

A property known as canActivate in the auth guard in angular is responsible for accepting numerous guards, which are checked before routing to a certain route.
import { NgModule } from '@angular/core';
import { Routes, RouterModule } from '@angular/router';
import { HomeComponent } from './home/home.component';
import { LoginComponent } from './login/login.component';
import { AuthGuard } from './auth.guard';
const routes: Routes = [
{ path: '', redirectTo: '/home', pathMatch: 'full' },
{ path: 'login', component: LoginComponent },
{ path: 'home', component: HomeComponent,
canActivate: [AuthGuard], // visit home only if authenticated
},
];
@NgModule({
imports: [RouterModule.forRoot(routes)],
exports: [RouterModule]
})
export class AppRoutingModule { }
If the token has expired, the user will not be able to visit /home route. Instead, the user will be redirected to /login route.
Open dashboard.module.ts to import the routes, like this:
...
import { RouterModule } from '@angular/router';
import { dashboardRoutes } from './dashboard.routes';
...
imports: [
RouterModule.forChild(dashboardRoutes)
]
…
Finally, we will attach the dashboard module to the main module. Therefore, your app.module.ts must appear like this:
import { BrowserModule } from '@angular/platform-browser';
import { NgModule } from '@angular/core';
import { RouterModule } from '@angular/router';
import { AppComponent } from './app.component';
import { LoginComponent } from './login/login.component';
import { PageNotFoundComponent } from './page-not-found/page-not-found.component';
import { APP_ROUTES } from './app.routes';
import { DashboardModule } from './dashboard/dashboard.module';
@NgModule({
declarations: [
AppComponent,
LoginComponent,
PageNotFoundComponent
],
imports: [
BrowserModule,
RouterModule.forRoot(APP_ROUTES),
DashboardModule
],
providers: [],
bootstrap: [AppComponent]
})
export class AppModule { }
Now, we will be fleshing out the components:
Open app.component.html to add router outlet
Now, update layout.component.ts template to snippet mentioned below:

Dashboard Layout
You will need to run ng serve - open.
Source
Step 4 - Route Guarding
Now, we will be guarding our dashboard so that the authenticated users will only use it.
ng g s guards/authGuard --spec false
Open guards/auth-guard.service.ts
Let’s now proceed to make our dashboard secure using the JWT strategy.
import { AuthService } from './../services/auth.service';
import { Injectable } from '@angular/core';
import { CanActivate, ActivatedRouteSnapshot, RouterStateSnapshot, Router, Route } from '@angular/router';
import { Observable } from 'rxjs';
@Injectable()
export class AuthGuard in angular implements CanActivate {
constructor(private _authService: AuthService, private _router: Router) {
}
canActivate(next: ActivatedRouteSnapshot, state: RouterStateSnapshot): Observable | Promise | boolean {
if (this._authService.isAuthenticated()) {
return true;
}
// navigate to login page
this._router.navigate(['/login']);
//you can save redirect url so after authing we can move them back to the page they requested
return false;
}
}
We just implemented the canActivate interface. That will determine if the component is to be entered or not. You will have to use the Authservice to check if there is a token in local storage and even check whether the token is valid or not.
If the canActivate returns true, the component is created; otherwise, it redirects the user to the login component.
...
import { AuthGuard } from '../guards/auth-guard.service';
...
export const dashboardRoutes: Routes = [
{
...
component: LayoutComponent,
canActivate: [AuthGuard],
...
}
];
What we did here was add an extra field to route can Activate. Now, you can create multiple guards for multiple purposes. For instance, what kind of user can actually see the dashboard after the entire angular authentication? Guards are processed in the similar order they were stored in can Activate array field. Finally, you will need to provide AuthGuard in dashboard.module.ts.
...
import { RoleGuard } from '../guards/role-guard.service';
...
children:[
...,
{
path: 'admin',
component: AdminComponent,
canActivate: [RoleGuard],
data: {role: 'Admin'}
},
...
];
Save and run the Angularjs app now!
Read our other blog to know the Step-by-Step Guide to Hire Angular Developers in detail.
Where to Store Route Guards?

In your Angular app, you must have the /auth directory that incorporates authentication-related files. Here the angular route guard and an auth service will contain an HTTP request to your server. Again, the idea is to determine the authenticated state of the users.
Here’s how the directory structure looks like:
src
|_ app
|_ ...
|_ auth
|_ auth.guard.ts
|_ auth.service.ts
Conclusion
Route guards in angular are not just useful for token-based authentication to routes. You can use them on your website to restrict users from visiting, let’s say, the checkout page in case they don’t have any item in the cart. However, remember that you must also validate that your other API endpoints offer access to user data for protected pages. It is essential as just validating the user authentication state in the front end is not enough. So, it is recommended to hire angular developers in India to ensure your app is safe for the users.

FAQs related to Angular Authentication Route Guards:
We have answered some common queries about Route Guards. For more information, you can contact us.
A route guard is a mechanism that helps to protect routes in an application from unauthorized access. It is a type of middleware that intercepts a user's attempt to access a specific route and checks whether the user has the necessary permissions or authentication to access it.
The types of Angular route guards for authentication are:
- CanActivate: This guard determines whether a user can access a route. It checks if the user is authenticated and has the necessary permissions to access the route.
- CanActivateChild: This guard is similar to CanActivate, but it checks whether a user can access child routes of a parent route.
- CanLoad: This guard determines whether a user can load a feature module asynchronously. It checks if the user is authenticated and has the necessary permissions to load the module.
- CanDeactivate: This guard determines whether a user can leave a route. It is often used to prevent users from accidentally leaving a page when they have unsaved changes.
- Resolve: This guard is used to resolve data for a route before it is activated. It can be used to fetch data from a backend API and make it available to a component.
- Use the Angular Router's built-in guards.
- Implement your own custom guards.
- Use third-party libraries such as ngx or ng2-permission.
- Use a server-side authentication and authorization system.


