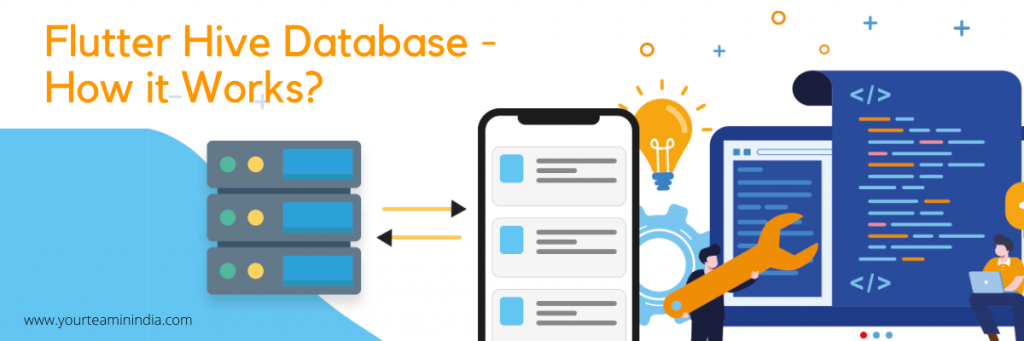
In this article, we will discuss a little about Flutter Hive Database, where you will get to know what hive is, what hive boxes are, something about type adapters are, and why you even need a flutter hive database, and finally, how it works.
So, without further ado, let’s jump right into understanding it all, starting with knowing what really is a hive in a flutter.
First, What is Hive in Flutter?
Hive is a dart package used in the Flutter application to store data locally, further manipulating the data on the targeted device. Hive’s performance is impressive when it comes to CRUD operations.
It is a fast, lightweight, NoSQL database for dart and flutter apps. Hive is beneficial when you require a straightforward key-value database, which is pretty simple to use without numerous relations. In addition, it is an offline database with no native dependencies.
Besides, it is quite seamless with storing the data securely using pretty strong encryption. Overall, that minimizes or even replaces the dependency on other conventional packages of Flutter, including ‘shared_preferences’ and ‘flutter_secure_storage’ together at once.

Second, What Exactly are Hive Boxes?
As we said above, Hive is pretty fantastic at storing the data securely using a robust encryption method. So, where does it store the data? In the hive boxes!
It stores data in boxes having key-value sets. The boxes are more like sorted organizers that securely keep files listed and arranged in a numbering framework, similar to that of normal maps in the dart. So, to read this data stored inside the boxes, you will have to open the boxes first to either read or compose it.
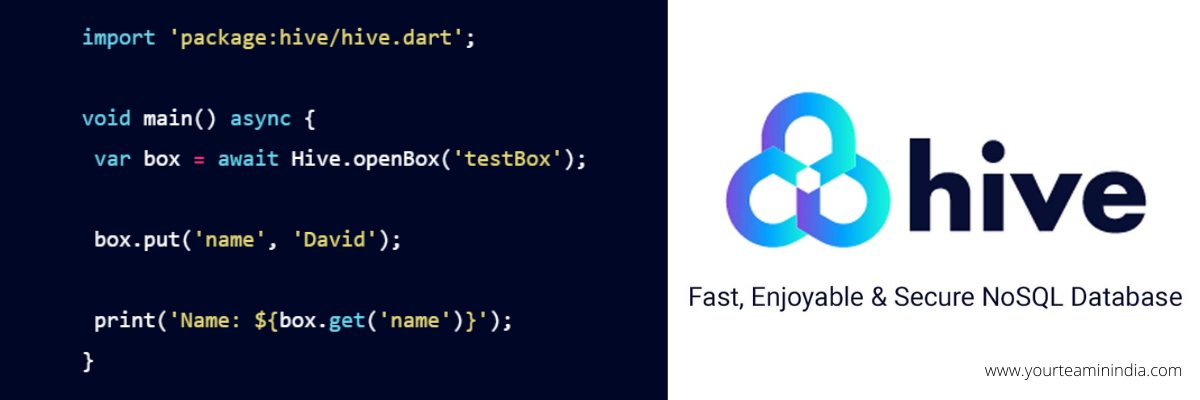
Wondering how to open it?
You can open with await Hive.Openbox(‘name’), where the name is the name of the case.
Third, What are Type Adapters?
Hive lets you store most standard types, including Map, List, DateTime, String, etc. Yet you will eventually need a model class for the data since that makes the overall process quite simpler for Flutter developers. For the purpose of utilizing the model kinds, you will need to enroll TypeAdapters, which allows you to encode or decode the item to its binary form on a disk.
Moreover, you can compose Type Adapters manually. Or generate it using hive_generator and build_runner packages. The model file is made inside the lib/folder.
Finally, Why Do You Even Need Hive Database?
With two most prominent reasons, we can conclude that it is a critical thing for Flutter developers and the app development process. And, here is why every you too need it for your flutter services:
- Flutter Hive is inevitably the effective, fastest, and high-performing database as compared to SharedPreferences and SQFlite.
- Hive has a seamless way of performing the basic CRUD aka Create, Read, Update, Delete operations.
- It works amazingly well on different platforms like browsers, desktops, and mobiles due to it having no native dependencies on pure Dart.
- Built-in robust encryption for utmost data security.
Flutter Hive Database - How it Works?
So, now is the time we move into the thorough process of the Flutter Hive database, step-by-step.
- Implementation
- Add Required Dependencies in pubspec.yaml File
hive: ^1.4.1+1
hive_flutter: ^0.3.0+2
path_provider: ^1.6.5
- Add Required Dev Dependencies
hive_generator: ^0.7.0+2
build_runner: ^1.8.0
- Start Importing
import 'package:hive/hive.dart';
import 'package:hive_flutter/hive_flutter.dart';
import 'package:path_provider/path_provider.dart';
- Run Flutter Packages
In this step, you will have to run the flutter packages get available in the root directory of the application.
- Enable AndroidX
Now, you will have to add this to your gradle.properties file.
org.gradle.jvmargs=-Xmx1536M
android.enableR8=true
android.useAndroidX=true
android.enableJetifier=true
- Implementation of the Code in Dart File
In the second step, you will have to implement it in the code. So, first, we will create the class, add the annotations so that the TypeAdapters are generated efficiently.
We will first begin by building a model class - DataModel.
import 'package:hive/hive.dart';
part 'data_model.g.dart';
@HiveType(typeId: 0)
class DataModel{
@HiveField(0)
final String title;
@HiveField(1)
final String description;
@HiveField(2)
final bool complete;
DataModel({this.title, this.description, this.complete});
}
First import hive. Then, add ‘data_model.g.dart’ as a section to generate the adapter. Also, you will need to clarify the model class with @HiveType(). Annotate every field that you need to save with @HiveField(index). Every index needs to show up once and must not be transformed. Here, what we have explained as @HiveField are three main factors, including the title, description, and complete to store.
What is new in Flutter to make it more adaptive? Read Here
Once that is done, you will be required to run a code generator, which will help you generate the database code.
$ flutter packages pub run build_runner build
// GENERATED CODE - DO NOT MODIFY BY HAND
part of 'data_model.dart';
// **************************************************************************
// TypeAdapterGenerator
// **************************************************************************
class DataModelAdapter extends TypeAdapter<DataModel> {
@override
final typeId = 0;
@override
DataModel read(BinaryReader reader) {
var numOfFields = reader.readByte();
var fields = <int, dynamic>{
for (var i = 0; i < numOfFields; i++) reader.readByte(): reader.read(),
};
return DataModel(
title: fields[0] as String,
description: fields[1] as String,
complete: fields[2] as bool,
);
}
@override
void write(BinaryWriter writer, DataModel obj) {
writer
..writeByte(3)
..writeByte(0)
..write(obj.title)Demo
..writeByte(1)
..write(obj.description)
..writeByte(2)
..write(obj.complete);
}
}
Create a new dart file, named, my_home_page.dart inside the lib folder.
floatingActionButton: FloatingActionButton(
onPressed: (){
showDialog(
context: context,
child: Dialog(
backgroundColor: Colors.blueGrey[100],
child: Container(
padding: EdgeInsets.all(16),
child: Column(
mainAxisSize: MainAxisSize.min,
children: <Widget>[
TextField(
decoration: InputDecoration(hintText: "Title"),
controller: titleController,
),
SizedBox(
height: 8,
),
TextField(
decoration: InputDecoration(
hintText: "Description"),
controller: descriptionController,
),
SizedBox(
height: 8,
),
FlatButton(
shape: RoundedRectangleBorder(
borderRadius: BorderRadius.circular(10.0),
),
color: Colors.red,
child: Text("Add Data",style: TextStyle(color: Colors.white),),
onPressed: () {
final String title = titleController.text;
final String description = descriptionController.text;
titleController.clear();
descriptionController.clear();
DataModel data = DataModel(title: title, description: description, complete: false);
dataBox.add(data);
Navigator.pop(context);
},
)
],
),
)
)
);
},
child: Icon(Icons.add),
),
Now, we will create the FloatingActionButton(). For that, open the dialog box with text fields in the button onPressed() method.
So, when have tapped on the floating button, there will appear a dialog box with some text fields - title, description, add button. We need to fill the text fields before hitting the data button, which will then helps in showing the data on your screen.
ValueListenableBuilder(
valueListenable: dataBox.listenable(),
builder: (context, Box<DataModel> items, _){
List<int> keys= items.keys.cast<int>().toList();
return ListView.separated(
separatorBuilder: (_, index) => Divider(),
itemCount: keys.length,
shrinkWrap: true,
scrollDirection: Axis.vertical,
physics: NeverScrollableScrollPhysics(),
itemBuilder:(_, index){
final int key = keys[index];
final DataModel data = items.get(key);
return Card(
shape: RoundedRectangleBorder(
borderRadius: BorderRadius.circular(15.0),
),
color: Colors.blueGrey[200],
child: ListTile(
title: Text(data.title, style: TextStyle(fontSize: 22,color: Colors.black),),
subtitle: Text(data.description,style: TextStyle(fontSize: 20,color:Colors.black38)),
leading: Text("$key", style: TextStyle(fontSize: 18,color: Colors.black),),
),
);
},
);
},
),
Okay, so now we are going to use the ValueListenableBuilder(), where we will be returning a ListView.separated(). After that, it is time to add itemBuilder, itemCount, shrinkWrap, and separator builder. For the one, that is, item Builder, we are going to return the card.
Now, on your screen, add a card, add a ListTile() and then add index, title, and description. Once that is done, you will have to add a trailing on a list tile method to further add the tick icon on the app.
trailing: Icon(Icons.check, color: data.complete ?
Colors.deepPurpleAccent : Colors.red,),
After we have done this, let’s now create a tap function on the list tile method.
onTap: (){
showDialog(
context: context,
child: Dialog(
backgroundColor: Colors.white,
child: Container(
padding: EdgeInsets.all(16),
child: Column(
mainAxisSize: MainAxisSize.min,
children: <Widget>[
FlatButton(
shape: RoundedRectangleBorder(
borderRadius: BorderRadius.circular(10.0),
),
color: Colors.blueAccent[100],
child: Text("Mark as complete",
style: TextStyle(color: Colors.black87),
),
onPressed: () {
DataModel mData = DataModel(
title: data.title,
description: data.description,
complete: true
);
dataBox.put(key, mData);
Navigator.pop(context);
},
)
],
),
)
)
);
},
Open a dialog box, and make a button to show the text ‘Mark as complete.’ Once this button is pressed, the tick color will automatically change from red to purple - basically from in progress to complete.
Read our other post to know why startups should consider flutter.
Now is the time to add a filter, and here we will create three different types of the same. First is All, where every data will be displayed on the screen with a second, completed, where only complete data will be displayed, and lastly, Progress, where only progress data will be shown on the screen.
enum DataFilter {ALL, COMPLETED, PROGRESS}
After all the filters have been added successfully, we will further create the PopupMenuButton(), where we will be able to add All, Completed, and Progress with DataFilter.
PopupMenuButton<String>(
onSelected: (value) {
if(value.compareTo("All") == 0){
setState(() {
filter = DataFilter.ALL;
});
}else if (value.compareTo("Compeleted") == 0){
setState(() {
filter = DataFilter.COMPLETED;
});
}else{
setState(() {
filter = DataFilter.PROGRESS;
});
}
},
itemBuilder: (BuildContext context) {
return ["All", "Compeleted", "Progress"].map((option) {
return PopupMenuItem(
value: option,
child: Text(option),
);
}).toList();
},
)
The default must show All. However, when clicked on any specific filter, it must show the items contained in that individual filter.
Well, after that, we will now add the filter function on ValueListenableBuilder(). Apart from that, we will even add a map to the keys with DataFilter.
if(filter == DataFilter.ALL){
keys = items.keys.cast<int>().toList();
}else if(filter == DataFilter.COMPLETED){
keys = items.keys.cast<int>().where((key) => items.get(key).complete).toList();
}else{
keys = items.keys.cast<int>().where((key) => !items.get(key).complete).toList();
}
Conclusion
So, we just learned how the basic structure of Hive Database works, what hive is, type adapters, and a few other things. We hope this article helps you be more familiar with Flutter Hive Database and ensure the Flutter app development is seamless after you have tried it yourself. You can even hire expert flutter developers in case you feel stuck somewhere. So, go ahead and try it now!
At your Team in India, we have a team of flutter experts. If you want to hire Developers or have any questions on what all services we offer at Your team in India– Click here to contact us.