Introduction
Power Automate, part of the Microsoft Power Platform, empowers users to automate workflows and streamline processes across various applications, including SharePoint. One common automation scenario is creating a reminder flow to ensure timely follow-ups or task completion. In this article, we'll guide you through the process of setting up a reminder flow in Power Automate for SharePoint.
Create a Reminder Flow
1. Create a list in Microsoft List with at least one DateTime column in the current view.
You can create and share lists that help you track issues, assets, routines, contacts, inventory, and more. Start from a template, Excel file, or from scratch.
From the Lists app in Microsoft 365, select +New list. (To get to the Lists app, at the top of any page, select the Microsoft 365 app launcher, select All apps, and then select Lists.)
From your SharePoint site home page or the Site contents page, select + New > List.
Share a list or list item with specific people

- Go to the list or select the list item you want to share, and then select Share.
- For lists, you can find Share in the top ribbon.
- For list items, you can find Share to the right of the Title column or in the top ribbon.
- Select People with existing access can use the link.
- Select Specific people, then Apply.
- Enter the names of the people that you want to share the list or list item with.
- Select the pencil icon to the right to set their level of access.
- If you're sharing a list, you have these permission options:
- Can edit list allows people to edit the entire list, including editing, adding, or removing items, columns, or views.
- Can edit items allow people only to edit, add, or remove items.
- Can view allows people only to view the list. They can't edit or share items or the list.
- If you're sharing a list item, you have these permission options:
- Can edit allows people to make any changes to an item. They cannot edit any other items or the list.
- Can view allows people only to view the item. They cannot view any other items or the list.
- If you're sharing a list, you have these permission options:
- Include a message if you want.
- Select Send.
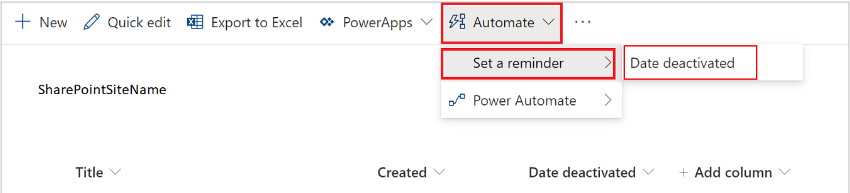
- Select Automate > Set a reminder > Date deactivated (this is the column with the DateTime for the reminder).
3. Optionally, you might need to sign into the services that this Power Automate template uses.
4. Select Continue.
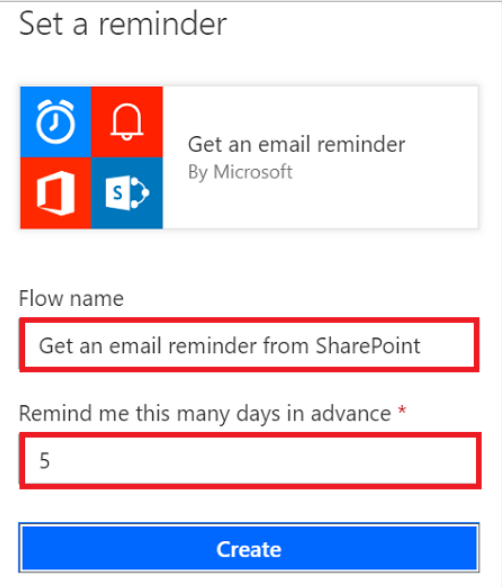
5. Provide a Flow name and the number of days prior to the DateTime column entry when you want to receive the reminder alert on the Set a reminder card.
6. On the Set a reminder card, select Create.
7. You'll receive the following message indicating that the flow was created.

Confirm reminders received
You'll receive a reminder via email, based on the Remind me this many day(s) in advance entry you made on the Set a reminder flow you created earlier.Edit your flow
The reminder flow is like any other flow, so you can access and edit it through Power Automate.Set a reminder flow
Receive an email reminder for items due soon with a pre-built Power Automate flow in Microsoft Lists or SharePoint. For the basic operations you can complete, see the following topics. Set a reminder appears in the Automate menu of all lists and libraries with an additional date column showing in the view.
Create a reminder flow
- Select Automate > Set a reminder > [select specific date column name here].
- Under the Set a reminder panel, Power Automate should sign you into the apps that the flow uses. When you see green check marks, select Continue.
- Enter a flow name, and number of days in advance reminder, and select Create.
Edit a Reminder Flow
-
Select Integrate > Power Automate > See your flows.
-
On the Power Automate website in the list, find the reminder flow by name.
-
To edit the flow, select
(pencil icon).
-
Change the number in the Days to remind me of action, and select Save.
Delete a reminder flow
-
Select Integrate > Power Automate > See your flows. The Power Automate website appears in a new browser tab.
-
Under My flows, for the most recent flow you've created, select Get an email reminder.
-
To verify that this is the right flow you just created on your particular SharePoint list or document library, select
(pencil icon).
-
To delete the reminder, back on the My flows page, select
(vertical ellipsis icon), and from the dropdown, select Delete.
Conclusion
Creating a reminder flow in Power Automate for SharePoint allows you to automate follow-up processes, improving efficiency and ensuring timely task completion. By following these steps, you can customize your reminder flow to meet the specific needs of your SharePoint environment. Experiment with different actions and conditions to enhance the functionality of your automated reminders.
Hire our skilled Power Automate developers to automate workflows, boost efficiency, and unlock the full potential of your organization. Let's transform your operations together!