When developing iOS applications with Swift, choosing the right architectural pattern is crucial. Two popular choices are Model-View-Controller (MVC) and Model-View-ViewModel (MVVM).
This article delves into the MVC vs MVVM debate, examining the strengths and weaknesses of each approach. Understanding MVC vs MVVM is essential for developers aiming to choose the right architecture for their projects. By comparing MVC vs MVVM, we aim to provide insights into how these patterns can influence code organization, ease of testing, and overall app performance, guiding developers towards more effective design choices.
What is MVC?
Model-View-Controller (MVC) is an architecture pattern widely used in iOS development. It provides a structured way of organizing code by separating it into three distinct components: the Model, the View, and the Controller.
- The Model represents the data and business logic of the application. It encapsulates the data structures, algorithms, and interactions with the database or network.
- The View is responsible for presenting the user interface to the user. It displays the data and communicates user interactions back to the controller.
- The Controller acts as an intermediary between the Model and the View. It receives input from the View, processes it, updates the Model if necessary, and updates the View accordingly.
When to use MVC?
MVC is a good choice for small to medium-sized projects with a relatively simple user interface and a straightforward data flow. It provides a clear separation of concerns and can be a good starting point for beginners due to its simplicity.
Looking to bring your iOS app idea to life? Hire our skilled iOS app developers today and turn your vision into a stunning reality. Get in touch now to start building your next successful app!
How to use MVC?
To implement MVC in a Swift project, follow these guidelines:
- Define your model classes and structs that represent the data and business logic.
- Create your view classes or storyboards that define the user interface.
- Implement your controller classes that handle user input and orchestrate the interaction between the model and the view.
Ensure that the responsibilities of each component are well-defined, and avoid placing excessive business logic in the controller.
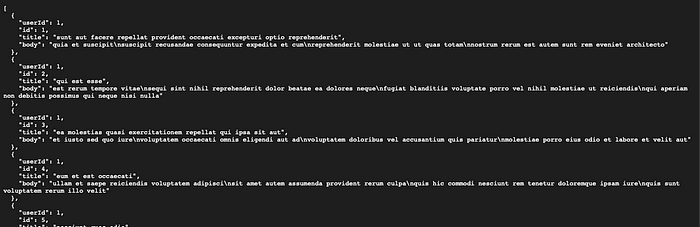
Let's see everything in action; we will create an app that will show a list of posts. We will be using the free API from Jsonplaceholder
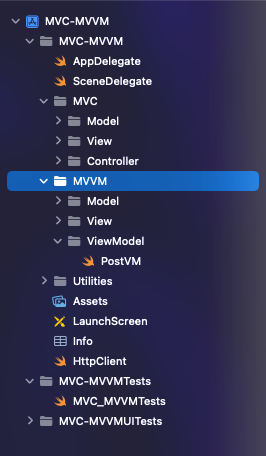
Our files directory will look like this
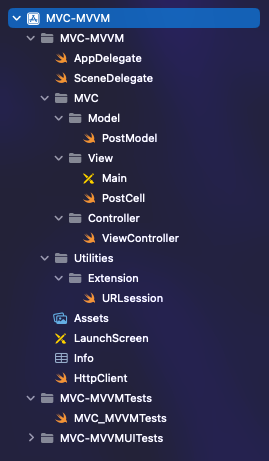
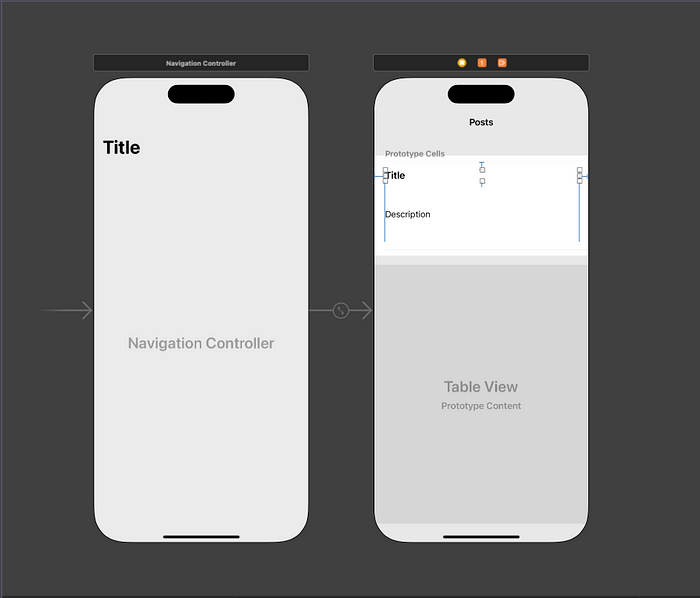
Here all the UI-related files, such as storyboards, xibs will be in the View folder. All the ViewControllers will be in the controller folder. Drag a UI viewController and add tableView on it. Connect the outlets and create a table view cell. Here, I have created a table view cell with the name of PostCell.
Our app will communicate with a server to fetch the posts, So to make a network request create an extension of URLSession
NOTE:
For simplicity, we do not delve deeper into networking. You can write the networking logic the way you want. I have created a simple method to fetch posts from the server.
| extension URLSession { func perform<T: Decodable>(_ request: URLRequest, decode decodable: T.Type, result: @escaping (Result<T, Error>) -> Void) { URLSession.shared.dataTask(with: request) { (data, response, error) in // handle error scenarios... `result(.failure(error))` // handle bad response... `result(.failure(responseError))` // handle no data... `result(.failure(dataError))` guard let data = data else {return} do { let object = try JSONDecoder().decode(decodable, from: data) result(.success(object)) } catch { result(.failure(error)) } }.resume() } } |
Now that our networking logic is set up, it's time to create a Model. API response has an array of dictionaries, and each dictionary is represented as a Post
So, To create a model, we will use the Decodable protocol (Assuming you know about this protocol)
We will create a new file PostModel under the Model folder.
import Foundation
| struct Posts : Decodable{ var userId : Int? var id : Int? var title : String? var body : String? } |
Now we will create an object of this Post model type in ViewController file
| private var postArr = [Posts]() |
In view, the controller creates a table view outlet and conforms to the delegate and data source methods. Now when the user lands on this screen, we need to make a network request that will fetch the latest posts from the server. To do that, let's create a method in ViewController
private func fetchPosts(){ URLSession.shared.perform(request, decode: [Posts].self) { [self] (result) in } |
Here fetchPosts method is using our URLsession extension method to make a request. We are decoding the data and checking if it was successfully decoded or not. If it succeeds, we are replacing the empty postArr to an object (decoded posts array) and reload the table view.
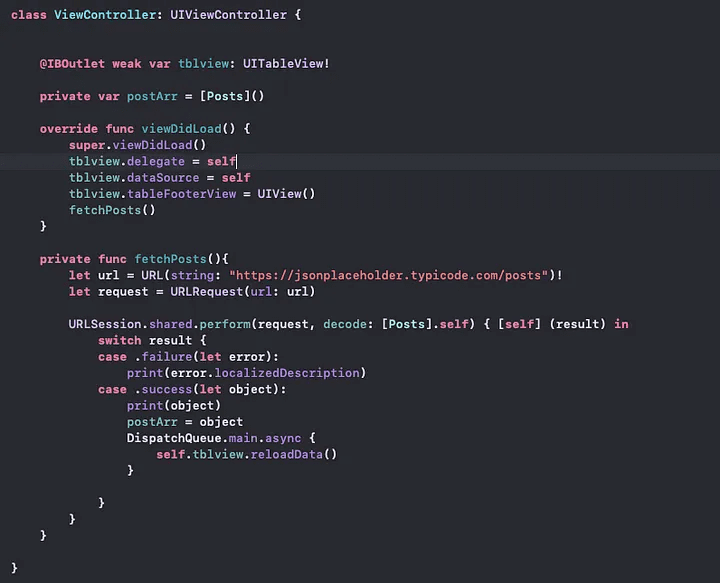
The complete code of the view controller should look like this
import UIKit
class ViewController: UIViewController { @IBOutlet weak var tblview: UITableView! private var postArr = [Posts]() override func viewDidLoad() { private func fetchPosts(){ URLSession.shared.perform(request, decode: [Posts].self) { [self] (result) in } } extension ViewController : UITableViewDelegate,UITableViewDataSource{ func tableView(_ tableView: UITableView, numberOfRowsInSection section: Int) -> Int { func tableView(_ tableView: UITableView, cellForRowAt indexPath: IndexPath) -> UITableViewCell { func tableView(_ tableView: UITableView, heightForRowAt indexPath: IndexPath) -> CGFloat { } |
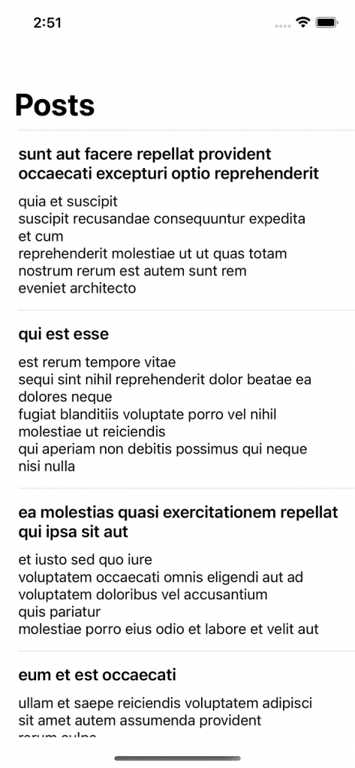
Now run the app, and you will see the list of posts fetched from the server; here, your controller directly talks with the model, and once the new data is fetched, the controller requests the views to update themselves. Here you can see we have written the business logic directly into the controller, which makes total lines of code increased and tightly coupled.
What is MVVM?
Model-View-ViewModel (MVVM) is another architecture pattern gaining popularity in iOS development. It builds upon MVC by introducing a new component called the ViewModel.
- The ViewModel is responsible for exposing the data and commands that the View needs to display and handle user interactions. It abstracts the view-specific logic away from the Model and provides an interface to bind the View to the data.
When to use MVVM?
MVVM is suitable for larger projects with complex user interfaces, as well as projects that require extensive unit testing. It promotes better separation of concerns and allows for easier testing of the ViewModel’s logic in isolation.
When to Choose MVVM for Enterprise Application Development?
MVVM is a strong architectural choice for enterprise application development when projects require scalability, maintainability, and collaboration across multiple teams. Consider choosing MVVM when:
-
Application complexity is high, and multiple screens share business logic.
-
Large development teams need a clear separation between UI and business layers
-
Automated testing is a priority, as ViewModels can be tested independently of the UI
-
Code reusability is important, allowing ViewModels to be reused across multiple views
-
The application is expected to scale with frequent feature updates and long-term maintenance.
How to use MVVM?
To implement MVVM in a Swift project, follow these steps:
-
Define your model classes or structs as in MVC.
-
Create your view classes or storyboards as in MVC
-
Implement your ViewModel classes, which expose properties and methods that the View needs to bind to. The ViewModel should also handle user interactions and update the Model accordingly.
To establish the connection between the View and the ViewModel, you can use bindings or reactive frameworks like Combine or ReactiveSwift.
Let’s see everything in action; we will use the same app and logic but power it using the MVVM pattern. We will be using the same MODEL file and the same VIEWS. Our files directory will look like this
In MVVM, we create the Model and Views in the same way we did in MVC. The only thing that we have to take care of here is creating a ViewModel, and establishing a connection between ViewModel and the controller (Remember, in MVC, the controller directly communicated with a model, in MVVM controller communicates with ViewModel, and viewModel communicates with the Model)
Let's create a file PostVM under ViewModel. Create a class called PostVM and move the postArr object and fetchPosts method from viewController to PostVM. It will throw a xcode error on the code of the line where we have reloaded our tableview, remove that line.
Now we have moved our fetching logic to View model, we need some type of mechanism that will pass the information back to viewController so that table view can reload. To do that lets create a Protocol with two methods
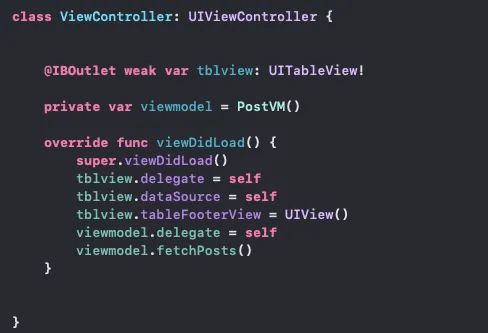
| protocol PostVMProtocol: AnyObject { func didGetError(error:String) func didGetPost() } Create an object of PostVMProtocol type in PostVM. weak var delegate PostVMProtocol! Now, in our fetchPosts method, call these methods using a delegate object, call the error method when decoding fails, and didGetPost when decoding is successful. Our PostVM will look like this import Foundation protocol PostVMProtocol AnyObject { func didGetError(error:String) func didGetPost() } final class PostVM{ var postArr = [Posts]() weak var delegate: PostVMProtocol! func fetchPosts(){ let url = URL(string: "https://jsonplaceholder.typicode.com/posts")! let request = URLRequest(url: url) URLSession.shared.perform(request, decode: [Posts].self) { [self] (result) in switch result { case .failure(let error): print(error.localizedDescription) delegate.didGetError(error: error.localizedDescription) case .success(let object): print(object) postArr = object DispatchQueue.main.async { [self] in delegate.didGetPost() } } } } } Now, in vthe iewController create an object viewmodel of PostVM type private var viewmodel = PostVM() Assign the delegate to self and call the fetchPosts method of PostVM in the viewDidLoad of the viewController viewmodel.delegate = self viewmodel.fetchPosts() Create an extension, add those two protocolmethods in the viewController, and reload the table view in didGetPost() extension ViewControlle : PostVMProtocol{ func didGetError(error: String) { print(error) } func didGetPost() { self.tblview.reloadData() } } |
In tableview delegates and datasources, now we can use the posts array that is in PostVM. Use the viewmodel object to call the postArr from PostVM.
|
extension ViewController : UITableViewDelegate, UITableViewDataSource{ func tableView(_ tableView: UITableView, numberOfRowsInSection section: Int) -> Int { func tableView(_ tableView: UITableView, cellForRowAt indexPath: IndexPath) -> UITableViewCell { func tableView(_ tableView: UITableView, heightForRowAt indexPath: IndexPath) -> CGFloat { } Our viewController will look like this now import UIKit class ViewController: UIViewController { @IBOutlet weak var tblview: UITableView! private var viewmodel = PostVM() override func viewDidLoad() { } extension ViewController: UITableViewDelegate ,UITableViewDataSource{ func tableView(_ tableView: UITableView, numberOfRowsInSection section: Int) -> Int { func tableView(_ tableView: UITableView, cellForRowAt indexPath: IndexPath) -> UITableViewCell { func tableView(_ tableView: UITableView, heightForRowAt indexPath: IndexPath) -> CGFloat { } extension ViewController: PostVMProtocol{ func didGetPost() { } |
Now run the app, and you will see the same list of posts, but behind the walls, we have used MVVM & if you compare the viewController in MVC & MVVM, you will see that with MVVM it's much smaller and clean. We have moved all the business logic into the ViewModel, and it can be easily tested. (To do the unit testing we have to use initializers to make it loosely coupled and testable.)
ViewController in MVC
Download the complete source code
MVC vs MVVM: Key Differences at a Glance
|
Aspect |
MVC |
MVVM |
|
Architecture Layers |
Model, View, Controller |
Model, View, ViewModel |
|
Business Logic |
Often inside the Controller |
Moved to ViewModel |
|
UI Updates |
Controller updates View |
View binds to ViewModel |
|
Testability |
Harder to test Controllers |
ViewModels are easier to test |
|
Code Maintainability |
Can lead to massive controllers |
Cleaner separation of concerns |
|
Best Use Case |
Small apps, prototypes |
Scalable and testable applications |
MVC vs MVVM in Modern SwiftUI Applications
a) State Driven User Interface
SwiftUI follows a state-driven UI approach. The interface updates automatically when the data changes. Because of this behavior, developers need an architecture that manages state clearly. MVVM fits well in this model.
b) ObservableObject and Published Properties
SwiftUI uses tools like ObservableObject and @Published properties. These allow the ViewModel to notify the view whenever the data changes. The UI then refreshes without manual updates.
c) Combine Framework for Data Flow
The Combine framework helps handle asynchronous data and events. ViewModels can process API responses and update the application state in a structured way.
Why MVVM Works Well with SwiftUI
SwiftUI focuses on UI presentation while the ViewModel manages state and logic. This separation keeps code organized and easier to maintain.
MVC vs MVVM: Which Architecture Should You Choose?
The choice between MVC and MVVM depends on the complexity of the application, the size of the team, and long-term maintenance needs.
Choose MVC if
-
The application is small or moderately sized
-
Rapid prototyping or quick development is required
-
The user interface and data flow are simple
-
A single developer or small team is managing the project
Choose MVVM if
-
The application is large or expected to scale
-
Testability and clean architecture are important
-
The UI has a complex state or frequent updates
-
Multiple teams are working on different layers of the application
Conclusion
Choosing between MVC and MVVM depends on the complexity and long-term goals of the application.
MVC works well for smaller projects where the structure is simple and development needs to move quickly. However, as applications grow, maintaining large controllers can become difficult.
MVVM offers clearer separation of responsibilities, better support for testing, and improved scalability.
For modern iOS applications, particularly those built with SwiftUI and reactive data flows, MVVM is often the more practical and maintainable architecture choice.


By Mangesh Gothankar

By Ashwani Sharma
By Achin Verma
Frequently Asked Questions
In the MVC architecture, the controller pattern plays a central role. The controller manages user input and coordinates updates between the model and the view layer.
Because much logic often sits in the controller, MVC can sometimes lead to tight coupling between UI and business logic. However, this structure gives developers complete control over application flow and works well for many client-side systems and traditional desktop apps.
In an MVVM framework, the view binds to the ViewModel using two-way data binding, allowing UI changes and data updates to stay synchronized automatically.
The ViewModel handles presentation logic without relying on code behind, which promotes loose coupling between layers. This structure simplifies testing and makes the architecture suitable for modern client-side applications where separation between UI and logic is important.
The primary difference between MVC and MVVM lies in how presentation logic is handled. MVC places logic inside controllers, while MVVM moves it to ViewModels, enabling better testability and cleaner UI separation.
Enterprises typically choose MVVM when applications require scalable architecture, automated testing, and clear separation between UI layers and business logic.
Can MVC and MVVM be used together in the same application?
Yes, many applications gradually evolve from MVC to MVVM by introducing ViewModels for complex screens while keeping simpler views in the MVC structure.


