Get started
D-ID's studio product with the amazing Generative AI capabilities of D-ID's API. Using our state-of-the-art, battle-tested products, you can now create videos of Digital Humans at an unbelievable scale. Combine your ideas with our tech to create astonishing visuals that are high quality and customized to your needs.
This API Integration Guide is specifically designed to help you incorporate the D-ID API into your applications with ease. This guide covers the essentials, such as authentication, API request construction, response handling, product descriptions, and use cases. A single image is all it takes to create a speaking digital human.
The versatility of the D-ID API extends across a multitude of programming languages, including popular options such as Node.js, Ruby, Python, PHP, C++, and numerous others. This expansive language support empowers developers with the flexibility to seamlessly integrate D-ID's innovative technology into their projects, regardless of their preferred programming environment.
Whether it's enhancing security measures, transforming visual content, or leveraging advanced image manipulation capabilities, the D-ID API opens the door to a wide spectrum of creative and practical applications, offering a unified solution that caters to the diverse needs of developers across different coding languages.
For More Information, Please visit the official website of D-id Studio.

Using D-id Api In Node Js
Project setup:-
First, create a new folder/directory in your system and name it D-id–Api-Tutorial. Then, open this folder in your favorite code editor. I’ll be using VSCode.
Next Step:-
make sure that Node.js is installed in your system. Write this command in your terminal to check whether it is installed.
We can check by running this command in our terminal.
It will show your installed version of Node js in your system.
Something like:- v18.1.0
With our static website now prepared, we are ready to commence the project initiation process using npm. To begin this step:
Execute this command within the integrated terminal of your code editor or any command line tool. Ensure that you are located in the main directory of this project when running this command.

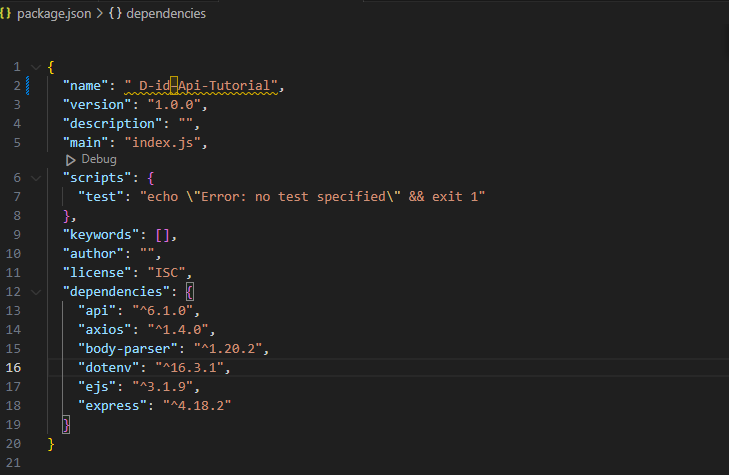
Executing the command npm init -y initiates the creation of a new package.json file. This essential file serves as a central hub for overseeing the dependencies that will be incorporated during the course of this guide. However, it is advisable to modify the default value for the main option within the package.json file from "index.js" to "server.js." This adjustment ensures accurate handling of your project's primary entry point, enhancing clarity and alignment with your intended structure
The generated package.json file should resemble the following structure:
Setting up the project with Node.js
Initially, it is essential to install the three fundamental npm packages pivotal for this tutorial. These packages encompass express, body-parser, and axios, forming the core prerequisites for the subsequent steps.
- Express will help us create different API endpoints and much more.
- body-parser will mount the data coming from the form onto the incoming request.
- We employ Axios in a concise manner to streamline HTTP requests and responses effectively.
- Dotenv is used to store and manage configuration settings for your application in a separate file, making it easier to control and update your application's environment variables.
- EJS is a templating engine that allows you to generate dynamic HTML content by embedding JavaScript code within your HTML templates
When building dynamic web applications, it's essential to have a way to generate HTML content dynamically based on data. EJS, which stands for Embedded JavaScript, is a templating engine for Node.js and the browser that enables you to inject JavaScript code directly into your HTML templates. In this article, we'll explore what EJS is, its features, and how to use it to create dynamic web pages.
Project Folder Structure:-

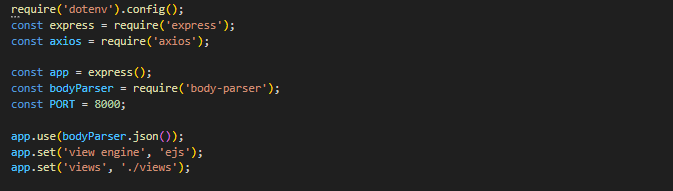
This is the content of my server.js file:-
- require('dotenv').config();: This line loads configuration settings from a file named ".env" into our project. It helps manage important information like API keys or sensitive data.
- const express = require('express');: We're using a tool called "Express" to build our website. It's like a set of tools that makes creating a website easier and faster.
- const axios = require('axios');: This line brings in another tool called "axios" that helps us talk to other websites or services over the internet. It's like a messenger that helps our website communicate with other places on the web.
- const app = express();: We're creating our actual website here, like a blank canvas. We'll be adding colors, images, and text to it using the tools we've loaded.
- const bodyParser = require('body-parser');: Think of this as a tool that helps us understand and work with the data that comes in and goes out of our website. It's like a translator that makes sure our website understands what people are saying and vice versa.
- const PORT = 8000;: This sets the number (8000 in this case) that your computer will use to identify our website when it's running. It's like giving our website a phone number so people can call and visit it.
- app.use(bodyParser.json());: This line tells our website to use the body-parser tool we mentioned earlier. It helps our website understand and handle data that comes in as JSON.
- app.set('view engine', 'ejs');: Here, we're telling our website to use a tool called "EJS" to help create and show the different pages of our website. It's like a template that helps us organize and display our content.
- app.set('views', './views');: This line tells our website where to find the templates (EJS files) that we'll be using to create our web pages.
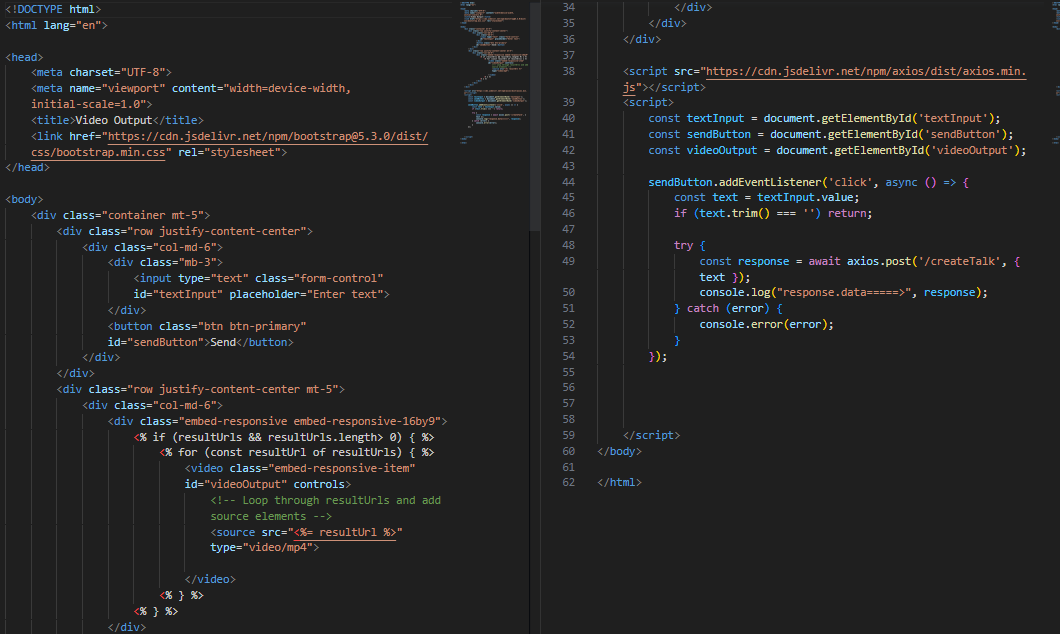
This is how my "views/index.ejs" file looks like:
Let’s start with D-id Api
To get the <YOUR_API_KEY> that allows our website to talk with D-ID's tools, go to their official website at D-id Studio. When you get there, sign up for an account, just like making a new account for a game or an app. Once you've done that, you'll get a secret code, like a magic password. Copy that code and come back to our website
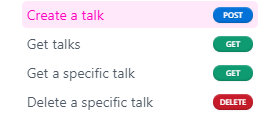
Create a talk:-
The given code snippet is an example of sending a POST request to the D-ID API to create a talk, which appears to involve generating a video with speech from a provided text input. It includes necessary headers, such as 'accept,' 'content-type,' and 'authorization,' along with JSON data specifying the script, source URL for images, and configuration settings.
Parameters used in the API request:
- method: Specifies the HTTP method as POST.
- url: The URL endpoint of the D-ID API for creating talks.
- headers: Contains necessary headers for the request, including authorization.
- data: JSON object containing script details, source URL, and configuration.

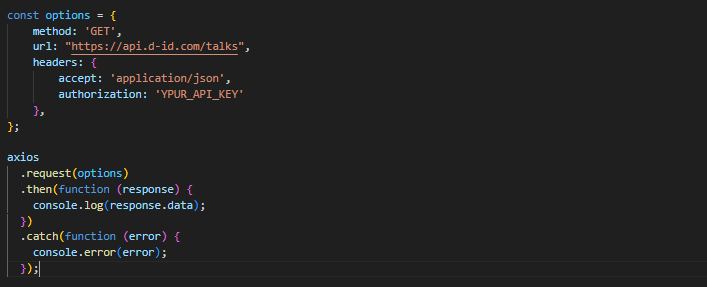
Get Talks:-
The provided code snippet illustrates a GET request to the D-ID API endpoint for fetching information about talks. Utilizing the axios library, the script constructs an API request with the specified method, URL, and required headers, which include an authorization token. Following the request, the code captures the response containing data related to talks. Any encountered errors are logged, and the error is thrown for subsequent handling.
Parameters used in the API request:
- method: Specifies the HTTP method as GET.
- url: The URL endpoint of the D-ID API for retrieving talk-related information.
- headers: Contains necessary headers, including authorization.
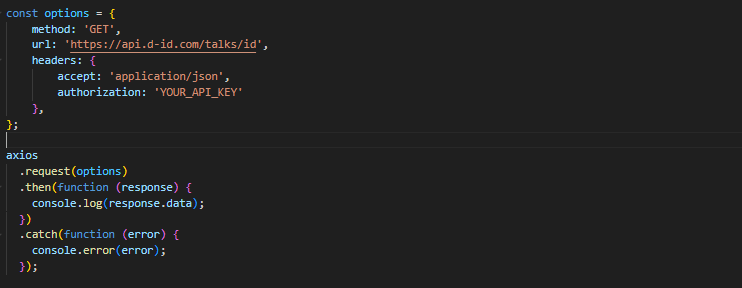
Get a specific Talk:-
The provided code snippet demonstrates a GET request to the D-ID API to retrieve information about talks associated with a specific user ID. The axios library is utilized to facilitate the API request, with necessary headers like 'accept' and 'authorization' being set. Upon successful response, the data containing information about talks is returned. In case of an error, the code logs the error and throws it for further handling.
Parameters used in the API request:
- method: Specifies the HTTP method as GET.
- url: The URL endpoint of the D-ID API, including the userId to fetch talks for.
- headers: Contains required headers, including authorization.
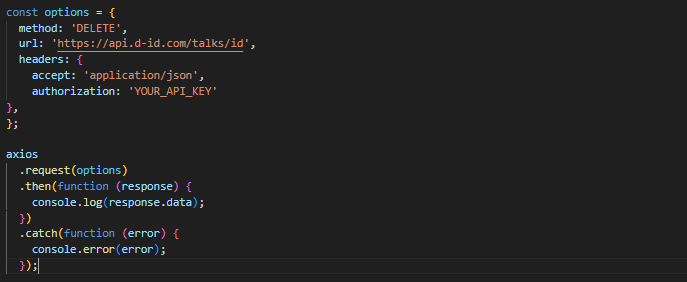
Delete a specific Talk:-
The provided code snippet employs the axios library to perform a DELETE request to the D-ID API for removing a specific talk identified by its ID. The script defines the request using the specified method, URL, and essential headers. Upon successful execution, the response data is logged, while any encountered errors are logged for error handling.
Parameters used in the API request:
- method: Specifies the HTTP method as DELETE.
- url: The URL endpoint of the D-ID API for deleting a specific talk, with id denoting the unique identifier of the talk.
- headers: Contains required headers, including the 'accept' header for specifying the response format.
Conclusion
This tool helps create videos of computer-generated people who can talk. It explains how to set up and use this tool in simple steps, like setting up a new folder on your computer and installing some basic software. It also shows how to talk to the tool using a special language that computers understand.
The article talks about how versatile and useful this tool is for different kinds of computer projects. It even gives examples of how to make the computer person talk, get information about them, and even delete them if needed. It also tells you how to get a special key to use this tool securely. The article ends by showing a real example of a video made using this tool to give you an idea of what it can do. So, if you're interested in making cool talking videos with computers, this article is your guide!
Are you searching for Node.js specialists to harness the full potential of Node.js? Hire NodeJS developer from YTII and get your application new dimensions.